TECHNICAL INFORMATION |
| We will use this page for torque specs, instructions, etc for some of our products. If you have a suggestion or there is something you might like to see on this page, please email me. Click on the link for the PDF file. |
INSTALLATION INSTRUCTIONS FOR TWIN DISC STREET CLUTCHES
|
INSTALLATION INSTRUCTIONS FOR 2 DISC, 3 DISC 0R 4 DISC CLUTCHES WITH MARK XII PRESSURE PLATE
|
INSTALLATION INSTRUCTION INSTRUCTIONS FOR 3 OR 4 DISC CLUTCHES WITH “NEXTGEN” PRESSURE PLATE
|
INSTRUCTIONS FOR STOCK REPLACEMENT CLUTCH |
INSTALLATION INSTRUCTIONS FOR MRP 4 DISC CLUTCH
|
FIRE RING GASKET KIT INSTRUCTIONS
|
|
RETORQUE INSTRUCTIONS FOR HEAD STUDS WITH OR WITHOUT FIRE RING GASKET
|
HEAD STUD KIT INSTALLATION INSTRUCTIONS
|
MAIN STUD KIT INSTALLATION INSTRUCTIONS
|
INSTALLATION INSTRUCTIONS ROD BOLT, HEAVY DUTY L-19
|
ARP RECOMMENDATIONS FOR HANDLING OF L-19 MATERIAL |
SMT ROLLER ROCKER TORQUE SPECS |
CAM THRUST PLATE
|
CUMMINS CYLINDER HEAD TORQUE SEQUENCE |
CUMMINS STOCK HEAD BOLT TORQUE
|
TORQUE SPEC FOR STOCK MAIN BOLTS
|
TORQUE SPEC FOR STOCK ROD BOLTS
|
DIFFERENCES IN 24V CYLINDER HEADS |
DANA 80 GIRDLE
|
TORQUE SPEC FOR 8MM ROCKER STAND STUDS
|
TORQUE SPEC FOR CASE IH FLYWHEEL BOLTS, 16 BOLT PATTERN |
Z-GAP RINGS – FULL SETS FOR FORGED PISTONS (i.e. Diamond, Ross, Arias etc) |
Z-GAP RINGS – 2ND RING ONLY (FOR OEM STYLE PISTONS) |
SMOKE TUBE SPEC SHEET FOR 4X4 TRUCKS |
BELT ROUTING DIAGRAM, 5.9 COMMON RAIL 2003-07 |
TORQUE ENHANCER INSTRUCTIONS |
WELDING AROUND BRAKE CLEAN – IMPORTANT INFO!
|
PPL PRO STOCK TURBO WRAP |
RACE SUIT WORK SHEET |
ARP STUD KIT INSTALLATION INSTRUCTIONS |
ARP MATERIALS INFORMATION
Three basic elements that contribute to the friction factor:
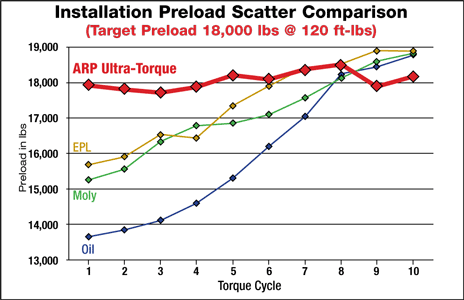
Because of these variables, a phenomenon known as “preload scatter” or preload error occurs. This is basically the difference between the amount of preload achieved on the first installation of the fastener and the amount of preload achieved on subsequent torque/loosen/re-torque cycles. It’s not uncommon to see “preload scatter” in the range of 4,000-8,000 pounds between the first and tenth pull on a new fastener depending on the lubricant used.
1. What is grain size and how important is it?
Metals freeze from the liquid state during melting from many origins (called allotropic) and each one of these origins grows until it bumps into another during freezing. Each of these is a grain and in castings, they are fairly large. Grains can be refined (made smaller); therefore, many more of them can occupy the same space, by first cold working and then by recrystallizing at high temperature. Alloy steels, like chrome moly, do not need any cold work; to do this – reheat treatment will refine the grain size. But austenitic steels and aluminum require cold work first. Grain size is very important for mechanical properties. High temperature creep properties are enhanced by large grains but good toughness and fatigue require fine grain size-the finer the better. (High temp creep occurs at elevated temperature and depending on material and load could be as much as .001 per inch/per hour.) All ARP bolts and studs are fine grain – usually ASTM 8 or finer. With 10 being the finest. 2. How do you get toughness vs. brittleness?
With steels, as the strength goes up, the toughness decreases. At too high a strength, the metal tends to be brittle. And threads accentuate the brittleness. A tool steel which can be heat-treated to 350,000 psi, would be a disaster as a bolt because of the threads. 3. Define Rockwell as we use it. Why do we use the C scale?
The man’s name was Rockwell and he developed a means of measuring hardness of metals which was superior to other methods. A Rockwell hardness tester measures the depth of penetration into the metal when a load is applied. For hard materials, a diamond penetrator is used. For soft material, small balls are used – 1/16” or 1/8˝ diameter-and the machine measures the depth. We use the C scale for the 120,000 psi strength level and above. The C scale uses the greatest load – 150 Kg. The A scale uses only a 60 Kg. load but can be correlated with C. It is necessary to use the A scale for thin sheets because using the 150 Kg load would cause the diamond to penetrate almost all the way through. 4. What is “micro hardness?”
Some parts are too small to be Rockwell hardness tested. They are placed in hard plastic and a microscope is used to place a small indenter into the metal. Using the microscope the length of the impression is measured. 5. How does modulus of elasticity refer to our products?
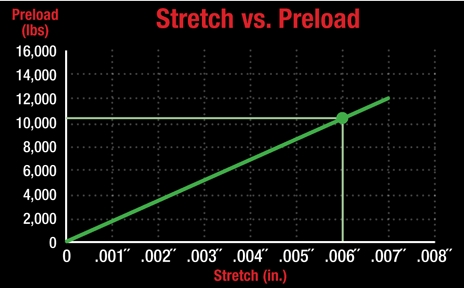
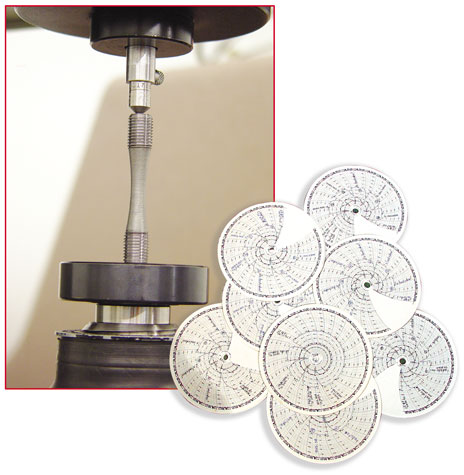 The modulus of elasticity of all alloy steels is exactly the same – 30,000,000 psi. This is true whether it is heat-treated or not – whether it is 100,000 psi strength level or 300,000 psi. Metals are like a spring – put a load on them and they will stretch – double the load and they will stretch double. This is important in connecting rod bolts because by measuring the stretch we really are measuring the load. Load is what is important and measuring stretch of a given size and configuration bolt will indicate how much load is stretching the bolt. 6. What are metal carbides and what is their significance?
The strength of all alloy and carbon steels is derived from the metal carbides formed during the mill processing. The carbon in steels combines with iron, vanadium and with chromium, as well as many other metal alloy additions to form compounds, which are a very hard phase within the iron matrix. Tool steels generally have high carbon content (above .8%) and can be made very hard – but brittle. 7. What exactly is chromium?
Chromium is a metal and is typically used for plating because it is shiny. It is also used as an alloy addition to iron to form a stainless steel. A stainless steel must contain at least 12% chromium, but these lean chromium steels can still show some rust on the surface. Using 18% chromium will make a more rust resisting stainless. Exposing any stainless to oxygen at temperatures above 1200˚F will cause the chromium to join the oxygen and therefore leave the surface depleted in chromium if it falls below 12% the surface will show rust. 8. What does it mean when a broken part looks crystallized?
When the fracture face has a rocky appearance it is because the material had a very large grain structure. Basically the grain grew during manufacturing due to poor technique and handling. A properly processed part will have a silky smooth appearance which is an indication of fine grain size. So crystallization does not occur as a result of load or fatigue – it was present in the material at the time of manufacture. 9. Define “precipitation hardening” and “phase change.”
The precipitation hardening comes from microscopic precipitation of hard phases which serve to keep rows of atoms from moving under stress. Some metals undergo a change in atomic structure at high temperature. Alloy steels, which are bcc at room temperature, become fcc at temperatures above 1400°F. This switch over is called a phase change. When cooled down they revert back to the bcc structure. Management of this phase is extremely critical and ARP maintains a complete in-house heat-treatment facility. It’s the only way we can assure material integrity. 10. What does a “face centered cubic” (fcc) atom arrangement look like? How many atoms?
A face centered cubic arrangement of atoms (austenitic) looks like a Las Vegas die with a five showing on all six faces. This can’t be seen visually by any type of microscope. 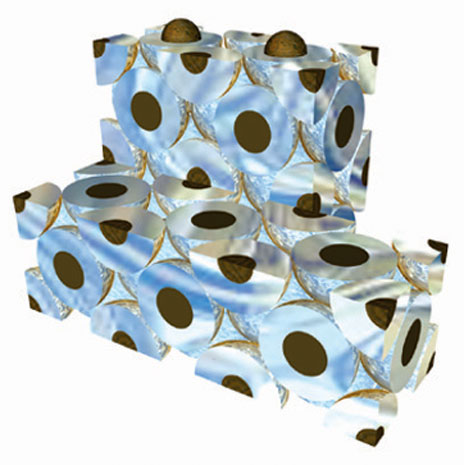 The number of atoms in any one cubic cell would be 14 – these do not stand alone but are attached to other cells which share some of the atoms. 11. How does a “body center cubic” (bcc) atom look? How many atoms?
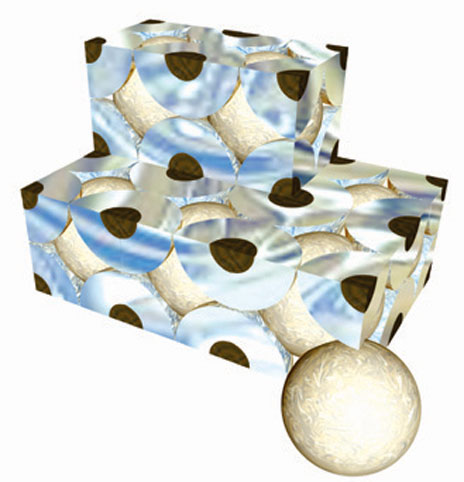 The body center cubic structure would look like a die with a four on all faces and one atom in the center of the cube. The atomic arrangment of pure iron is bcc at room temperature and does not change until the temperature reaches 1674˚F. At this temperature it changes to austenite which is face center cubic (fcc). The addition of carbon to the iron lowers this transition temperature. This is the basis for heat treatment of steel. If the iron carbon alloy (steel) is quenched from the fcc field, the structure becomes martensite, a very hard strong condition. 12. What does a “stainless steel” atom arrangement look like? How many atoms?
A face centered cubic arrangement of atoms Stainless Steel 300 series is not heat-treatable. But heavy reduction (power dumping), in the cross section, during forging causes a dramatic increase in strength. This is the process ARP uses to make 304 Stainless Steel reach 170,000 psi UTS. 13. How do the space lattice or crystal structures appear?
All grains or crystals are composed of atoms bound together in a definite pattern. These structures are called space lattice or crystal structures. At a fixed temperature, the atoms in an array are spaced a definite distance from one another, although they vibrate about their mean position. Even though atoms are actually not held together in this manner, it is helpful to picture the crystals as a 3-dimensional latticework connected by imaginary lines. Metallurgists who primarily study ferrous metal are interested in only two basic crystal structures: bcc (body-centered cubic) and fcc (face-centered cubic). 14. What are the metallurgical ramifications of “cold heading” vs. “hot heading”?
Cold heading is a more efficient process and allows the part to be cold worked. The temperatures used for hot forging will reduce the effect of work hardening. This is important for metals which derive much of their strength from the cold work. Cold heading produces a better product than hot heading. The number and force of the blows of the cold heading machine can make a significant difference in the quality of the end product. Excessive numbers of blows can lead to voids in the bolt head. ARP, in fact, holds significant patents on cold heading procedures for the higher nickel and cobalt based alloys. 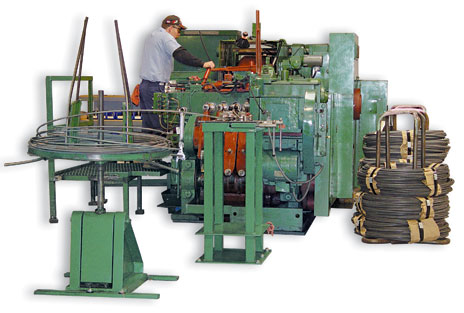 Our patented process begins with a softer wire that can be cold forged. The process work hardens the head and the under head area to the desired hardness. We then power extrude the front end to achieve the reduction and hardness in the shank resulting in a bolt with even strength and hardness from end to end. In a typical aerospace manufacturing process, these alloys are hot headed from bars, reduced in diameter from 48 to 50% by cold drawing, resulting in a hardness of about Rockwell C46 which is too hard for cold heading. So, the blanks are locally induction heated in a very narrow temperature envelope and hot headed. The process reduces the hardness immediately in the area under the head approximately 3 to 5 points on the Rockwell C scale. Subsequent heat treatment does not restore this partially annealed area to full hardness and strength. The final result is a relatively soft-headed bolt. Therefore, this process is not used by ARP. 15. What is the difference between the usage of “bar” material vs. “wire”?
Bars produced by the mill in straight sections are normally shipped in 12 foot lengths. Wire is supplied in continuous coil form and is hundreds of feet in length. Bars are cut to length and the bolts are hot forged from these lengths. Wire on the other hand is fed into a cold header in a continuous manner. 16. What exactly is A286? And to what is it compared?
A286 is a 25% nickel and 18% chromium alloy with smaller amounts of titanium and aluminum, which precipitate during aging – after solution treatment. It is a true stainless steel due to the high chromium and it is austenitic due to the high nickel. A286 was developed as a high temperature alloy for use in pre-jet aircraft engines. The strength level was only 140,000 psi, but it had good high temperature strength and exceptional toughness, making it an excellent fastener alloy. Rocketdyne became interested in it for rocket engines being developed in the early 60’s. But they required higher strength. We were part of the team that developed a thermo-mechanical method to produce a strength level of 200,000 psi. This involved severe cold reduction after solution treatment and before aging. An aerospace material spec (AMS) was then written requiring this treatment for 200,000 psi strength level. There is no other steel alloy, at this level, which can match A286 for corrosion resistance, toughness or bolt fatigue strength. 17. Define “Power Dump.”
This is a term used to define the heavy extrusion of the fastener body during forging. The part is forced into a die much smaller than the blank thereby causing a severe reduction in cross section area. This reduction of the cross sectional area is accompanied by an increase in length because metals can’t be compressed. However, power dumping or reduction, delivers a significant increase in strength properties and is part of the patented process we use to produce fasteners from 304 stainless steel with 170,000 psi UTS and AMS 5844 (ARP 3.5) with ultimate tensile strengths in the 270,000 psi UTS range with outstanding fatigue. 18. What is the difference between 4130 and 8740 chrome moly?
Both are alloy steels with similar chemistry. The 4130 has only .3% carbon and can’t be hardened as high as 8740, which has .4% carbon. Also, 8740 has about .45% nickel and 4130 has none. Both have moly (most alloy steels have moly). The chromium content of 4130 is slightly higher, .95% instead of .55%. However, 8740 is generally considered to have slightly better toughness due to the nickel. 19. What exactly is ARP2000 and how does it compare to 8740 and 4340?
ARP2000 is a heavily alloyed martensitic quench and temper steel, initially developed for use in steam power plants. As such it has excellent stability at high temperatures. But most important, ARP research discovered that in addition to temperature stability it has excellent notch toughness in the higher strength ranges and is alloyed to be tempered to Rc44/47. 8740 and 4340 can be tempered to the same hardness. But, the tempering temperature would yield material in the “temper brittle zone” (between 500° and 700°F), producing significant notch sensitivity. ARP2000 is tempered above that temperature range and has a strength between 200,000 and 220,000 psi. 20. How does L19 compare to ARP2000?
L19 differs from ARP2000 in that it is a vacuum melted alloyed steel with sufficient chromium and carbon to achieve high hardness (but below the level of a stainless steel). L19 is air-cooled from the hardening temperature in a way that does not require an oil quench to achieve full hardness and is tempered to assure full conversion to martensite between 1025°F and 1075˚F. L19 is a proprietary material capable of achieving strengths of 220,000/230,000 or 260,000/270,000 psi as may be required. Both L19 and ARP2000 steels are modified bcc (martensite) at room temperature. L19 has the same advantage as ARP2000 in that a high strength is obtained at a high tempering temperature. This alloy is easily contaminated and requires special handling. 21. What is AMS5844? And how does it compare to AMS5842E?
Both of these alloys are considered multiphase, non-steel, austenitic materials. Both derive their strength (260,000 psi) from severe cold work (48/50%) which raises the hardness from Rockwell C 46 up to 49/50. The AMS5842 (for MP159) was developed much later than AMS5844 (for MP35) in order to increase the usable service temperature by about 100° so it could be used in hotter sections of jet engines. 22. Provide a brief overview of the metallurgy required to produce AN, AMS & other Aerospace type fasteners.
All alloy steel fasteners are essentially manufactured by the same process. Incoming steel from the mill is forged to specification, then heat treated and thread rolled. Regular AN bolts are forged to size and are normally not precision ground. They may even have threads on them when heat treated. Expensive aerospace fasteners are more likely suited for some motorsport applications. These fasteners require precision forging, careful heat treatment and then precision grinding, fillet rolling under the head and a great deal of skill in thread rolling. 23. What is moisture tolerance and how or where is it important?
Non-stainless steels have low moisture tolerances because the water attacks the steel by forming iron oxide (rust). Therefore none of these have a high tolerance for moisture and the surface must be protected by oil or plating. ARP maintains an in-house plating facility to assure all non-stainless product is delivered 100% corrosion free. 24. How do the various standards compare to each other with regard to fasteners? Where are the standards?
A standard fastener is one that can be referenced from a nationally or internationally recognized standards document and may be produced by any interested manufacturer. In all fastener categories the custodian of each group (MS-AN-NAS) have tried to standardize the processing of specifications such as AS (American Standard) heat-treating, MIL-H-6875 cadmium plating, AMS QQ-P-416 passivation and AMS QQ-P-35 testing, MIL.-Std 1312 and NDT in aerospace applications are generally by sample. ASTM stands for the American Society for Testing Materials, a large industry funded group used to write standards for many materials and testing procedures. It compares directly to AMS (Aerospace Material Standard). In the case of ARP, 100% raw material is purchased to AMS specification – with the exception of special alloys used in proprietary products. All materials are carefully examined for proper chemistry – and finally, periodic examination by an independent laboratory. ARP consistently strives to exceed industry specifications for quality and product management. MS (Military Standards): MS bolt specifications cover a wide range of fastener hardware, high strength bolts, nuts and washers with spec’s for materials and processing. MS fasteners have various tensile strengths. AN (Army-Navy) Specifications: Generally lower strength bolts and studs primarily in the 125 psi UTS range. AN also covers a wide range of nuts, washers and other hardware. NAS (National Aerospace Standard): These specifications cover fasteners in the strength ranges 160,000/180,000/200,000 psi UTS. ISO (International Standards Organization): ISO 9001-94: is a quality control system designed for manufacturers with design control. ISO 9002-94: is a quality control system designed for manufacturers who build parts to customer specifications, and do not have design control. ISO 9001-2000: is current ISO system well suited for manufacturers with engineering design functions, drawing control and statistical techniques to achieve demanding quality requirements. This system is the main focus of ARP’s World Quality Concept. 25. What metallurgical issues cause common failures?
Material Specifications
ARP manufactures fasteners from a wide assortment of materials ranging from popular stainless steel and 8740 chrome moly to exotic alloys that have been developed to handle space travel. You should also know that there are grades within specific alloys. For example, 8740 is available in four grades:
ARP uses only the first two (SDF and CHQ), even though they cost more than double “Aircraft” quality. Stainless Steel: Ideally suited for many automotive and marine applications because stainless is tolerant of heat and virtually impervious to rust and corrosion. ARP “Stainless 300” is specially alloyed for extra durability. It’s polished using a proprietary process to produce a beautiful finish. Tensile strength is typically rated at 170,000 psi. 8740 Chrome Moly: Until the development of today’s modern alloys, chrome moly was popularly considered a high strength material. Now viewed as only moderate strength, 8740 chrome moly is seen as a good tough steel, with adequate fatigue properties for most racing applications, but only if the threads are rolled after heat-treatment, as is the standard ARP production practice. Typically, chrome moly is classified as a quench and temper steel, that can be heat-treated to deliver tensile strengths between 180,000 and 210,000 psi. ARP2000®: ARP2000 is an alloy steel that can be safely heat treated to a higher level, producing a greater strength material than 8740. While 8740 and ARP2000 share similar characteristics – ARP2000 is capable of achieving a clamp load at 220,000 psi. ARP2000 is used widely in short track and drag racing as an up-grade from 8740 chrome moly in both steel and aluminum rods. Stress corrosion and hydrogen embrittlement are typically not a problem, providing care is taken during installation. L19: This is a premium steel that is processed to deliver superior strength and fatigue properties. L19 is a very high strength material compared to 8740 and ARP2000 and is capable of delivering a clamp load at 260,000 psi. It is primarily used in short track and drag racing applications where inertia loads exceed the clamping capability of ARP2000. Like most high strength, quench and temper steels – L19 requires special care during manufacturing to avoid hydrogen embrittlement. This material is easily contaminated and subject to stress corrosion. It must be kept well-oiled and not exposed to moisture. Aermet®: With a typical tensile strength of 290,000-310,000 psi, Aermet is a new martensitic super-alloy that is stronger and less expensive than the super-alloy austenitic materials that follow. Because it is capable of achieving incredibly high clamping loads, it is ideal for short but extreme environments like top fuel, funny car and some short track applications. Although Aermet is a maraging steel that is far superior to other high strength steels in its resistance to stress corrosion, it must be kept well-oiled and not exposed to moisture. Inconel 718: A nickel based material that is in the high temperature, super-alloy class, it is found to be equally suitable in lower temperature applications. This material delivers tensile strengths in the 210,000-230,000 psi range and exhibits improved fatigue properties. Best of all, Inconel 718 is completely immune to hydrogen embrittlement and corrosion. ARP3.5® (AMS5844): While similar to Inconel 718, these super-alloys are found in many jet engine and aerospace applications where heat and stress attack the life of critical components. The high cobalt content of this alloy, while expensive, delivers a material with superior fatigue characteristics and typically tensile strength in the 260,000-280,000 psi range. The immunity to hydrogen embrittlement and corrosion of these materials is a significant design consideration. These materials are primarily used in connecting rods where extremely high loads, high RPM and endurance are important factors – Formula 1, NASCAR and IRL applications. Custom Age 625 Plus®: This newly formulated super-alloy demonstrates superior fatigue cycle life, tensile strength and toughness – with complete resistance to atmospheric corrosion and oxidation. ARP is the first to develop manufacturing and testing processes for fasteners with Custom Age 625+. Best of all it is less expensive and expected to soon replace MP-35 as the material of choice in the high strength, super-alloy field. Typical tensile strength is 260,000-280,000 psi. Titanium: ARP now offers special order fasteners made of an alloy (Ti6Al-4V) that is specially heat-treated (a process developed by ARP’s own Russ Sherman) and provides superior strength to other titanium alloys employed in racing and aerospace. The material has a nominal tensile strength of 180,000 psi, and is very corrosion resistant. The main advantage of titanium, of course, is its weight – which is about 40% lighter than a comparable fastener made of steel. Head studs and accessory bolts are ideal applications for this lightweight material. * AerMet®, Custom 450® and Custom Age 625 PLUS® are all registered trademarks of CRS Holdings Inc., a subsidiary of Carpenter Technology Corporation. |
Tech Page
TECHNICAL INFORMATION |
| We will use this page for torque specs, instructions, etc for some of our products. If you have a suggestion or there is something you might like to see on this page, please email me. Click on the link for the PDF file. |
INSTALLATION INSTRUCTIONS FOR TWIN DISC STREET CLUTCHES
|
INSTALLATION INSTRUCTIONS FOR 2 DISC, 3 DISC 0R 4 DISC CLUTCHES WITH MARK XII PRESSURE PLATE
|
INSTALLATION INSTRUCTION INSTRUCTIONS FOR 3 OR 4 DISC CLUTCHES WITH “NEXTGEN” PRESSURE PLATE
|
INSTRUCTIONS FOR STOCK REPLACEMENT CLUTCH |
INSTALLATION INSTRUCTIONS FOR MRP 4 DISC CLUTCH
|
FIRE RING GASKET KIT INSTRUCTIONS
|
|
RETORQUE INSTRUCTIONS FOR HEAD STUDS WITH OR WITHOUT FIRE RING GASKET
|
HEAD STUD KIT INSTALLATION INSTRUCTIONS
|
MAIN STUD KIT INSTALLATION INSTRUCTIONS
|
INSTALLATION INSTRUCTIONS ROD BOLT, HEAVY DUTY L-19
|
ARP RECOMMENDATIONS FOR HANDLING OF L-19 MATERIAL |
SMT ROLLER ROCKER TORQUE SPECS |
CAM THRUST PLATE
|
CUMMINS CYLINDER HEAD TORQUE SEQUENCE |
CUMMINS STOCK HEAD BOLT TORQUE
|
TORQUE SPEC FOR STOCK MAIN BOLTS
|
TORQUE SPEC FOR STOCK ROD BOLTS
|
DIFFERENCES IN 24V CYLINDER HEADS |
DANA 80 GIRDLE
|
TORQUE SPEC FOR 8MM ROCKER STAND STUDS
|
TORQUE SPEC FOR CASE IH FLYWHEEL BOLTS, 16 BOLT PATTERN |
Z-GAP RINGS – FULL SETS FOR FORGED PISTONS (i.e. Diamond, Ross, Arias etc) |
Z-GAP RINGS – 2ND RING ONLY (FOR OEM STYLE PISTONS) |
SMOKE TUBE SPEC SHEET FOR 4X4 TRUCKS |
BELT ROUTING DIAGRAM, 5.9 COMMON RAIL 2003-07 |
TORQUE ENHANCER INSTRUCTIONS |
WELDING AROUND BRAKE CLEAN – IMPORTANT INFO!
|
PPL PRO STOCK TURBO WRAP |
RACE SUIT WORK SHEET |
ARP STUD KIT INSTALLATION INSTRUCTIONS |
ARP MATERIALS INFORMATION |
